This article is your guide to setting up WordPress on Laragon, And you will learn How to Install WordPress on Laragon, especially tailored for those venturing into the world of site design. While options like WAMP and XAMPP exist for creating a learning environment, our recommendation is Laragon. Unlike the more established alternatives, Laragon may be a hidden gem in the realm of simulators. Once you experience its installation process, you might find yourself becoming a regular user. Join us as we walk through the steps of installing WordPress on Laragon, unlocking a unique and user-friendly pathway for your website development journey.
What is Laragon
Let’s take a moment to explore the backstory of Laragon before delving into the installation process. Crafted by Leo Joa, the CEO of DevOps, Laragon stems from a vision to infuse joy into the world of site design. Leo’s mission was clear — to create an environment that makes site development not just efficient but enjoyable.
Laragon, beyond being a professional simulator, serves as a versatile space for various applications like Nginx, node.js, Redis, PHP, MYSQL, and Apache. This flexibility positions Laragon as an ideal tool for implementing prototypes and bringing your envisioned projects to life swiftly.
Choosing Laragon over its counterparts is not just a preference; it’s a decision grounded in its outstanding features. As we guide you through installing Laragon, consider the potential it holds for enhancing your development experience, making it both productive and enjoyable.
Explore the distinctive features that set Laragon apart:
Forget about the typical localhost URL – Laragon lets you personalize it with the .test extension, giving you a unique URL like (yourdomain.test).
Unlike other server simulators, Laragon boasts a remarkably low impact on your Windows resources. Running on less than 4 MB of RAM, it ensures a smooth experience without burdening your system.
Portability is a key strength; effortlessly move Laragon between drives with a few simple clicks, making it convenient to transfer this software to different locations on your computer.
Unlock the potential of simultaneous use of Apache and Nginx servers by installing Laragon, adding a layer of flexibility to your development environment.
For efficient client interactions, Laragon facilitates the quick delivery of implemented sites with just one click.
Experience the versatility of Laragon’s setup, allowing seamless integration of various applications like Nginx, node.js, Redis, PHP, MYSQL, and Apache onto your desktop.
Leave behind the complexity of other simulators like XAMPP and Wamp; transition to Laragon for a more enjoyable site design experience that is both swift and straightforward.
Tailor your PHP version effortlessly with a single click, providing the flexibility to adapt to different project requirements.
Enjoy swift and straightforward processes when it comes to installing and upgrading Laragon software, ensuring you stay up-to-date with ease.
Learn how to install Laragon on Windows
Embark on the journey of installing the robust Laragon software on your Windows system. If you haven’t ventured into the realm of Laragon yet, let’s walk through the process together, step by step.
To kick things off, head over to laragon.org and navigate to the top menu. There, you’ll find the download option awaiting your click. Once selected, you’ll be directed to the download page, where you’ll encounter two versions of Laragon, as illustrated in the accompanying image. Join us as we guide you through this seamless installation experience. Let’s get started on unleashing the potential of Laragon on your Windows environment.
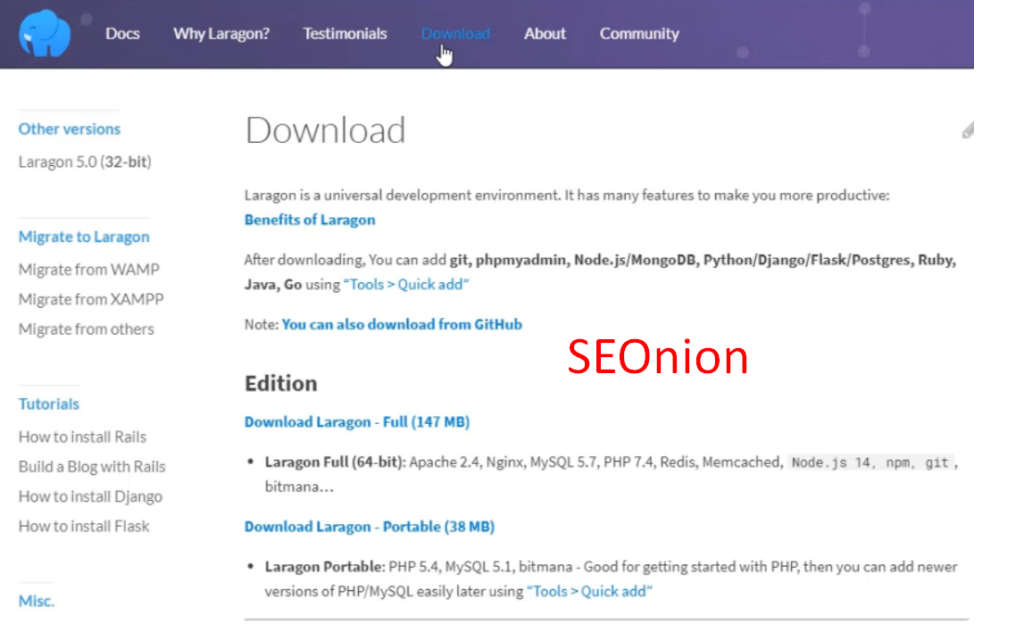
Download option laragon-full (147MB), i.e., download the full version. Wait for it to download. Then click on the exe file and select all the download steps, a program including the language selection (which is better English) and the installation location by default, the same c drive, and click install.
Once the program is installed, you will see a menu at the top left of the screen, which gives you unique features.

Now click start all to run Largon for you.
One of the options at the bottom of the page is root. To install WordPress, you must enter this section. On the next page, you will see the laragon address bar.
How to install WordPress on Laragon
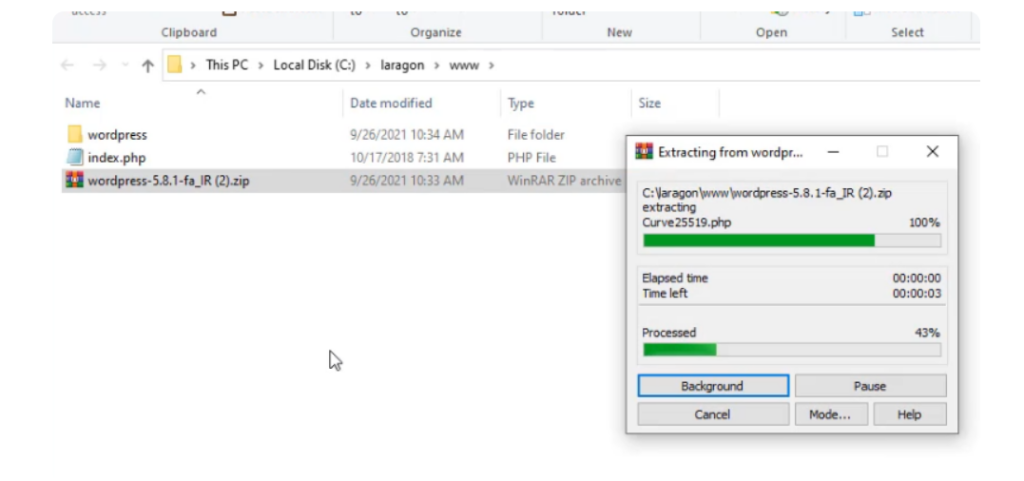
Navigate to either fa.wordpress.org or wordpress.org and acquire the latest version of WordPress. Once the download is complete, take a moment to marvel at your newly obtained WordPress package. Now, for the seamless integration – copy the zipped file and gracefully paste it into the root path. Unleash the contents of the file in the same section, revealing the WordPress folder housing all the essential files.
Here’s a pro-tip for a cleaner setup: consider cutting the files within the WordPress folder and pasting them directly into the root section. Efficiently remove the now-empty WordPress folder. This little step ensures that when you open localhost in your browser, the hassle of adding the word ‘WordPress’ to the URL becomes a thing of the past. Enjoy a smoother and more intuitive experience.
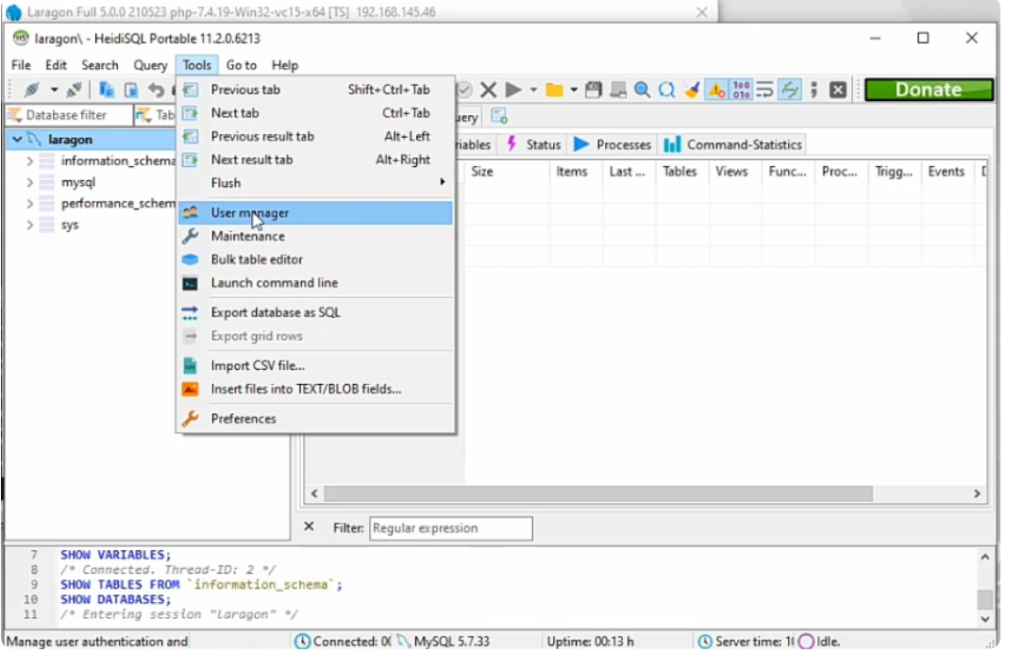
Navigate to Laragon, and at the bottom of the page, explore the menu to find the database option. No need to delve into the settings section; simplicity is key here. Directly click on the ‘Open’ option at the bottom of the page. As you transition to the new page, cast your eyes on the top menu – here lies the ‘Tools’ option. Embrace the next step by entering the ‘User Manager’ section, where you can effortlessly define a username from the drop-down menu. Let’s keep the process smooth and straightforward as we shape the foundations of your Laragon experience.
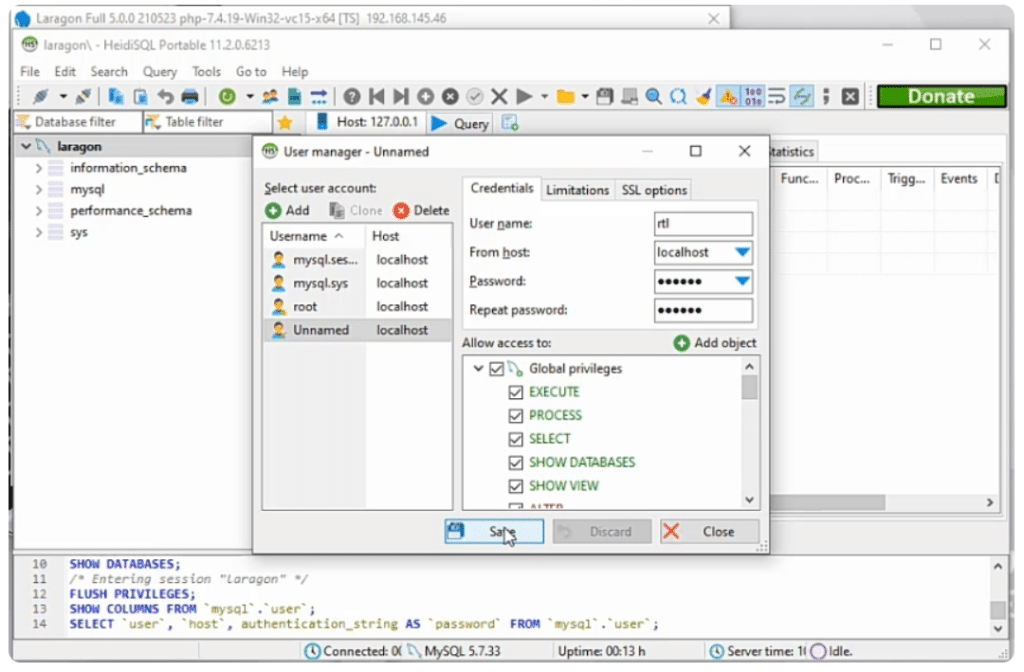
Let’s take the next step: click on ‘Add’ and infuse personality into your Laragon experience by entering your desired username and password on the fresh page. Ensure a secure login by repeating the password in the corresponding section. Don’t miss the crucial detail – at the bottom, tick the ‘Global privileges’ checkbox to secure the necessary permissions. With the stage set, wrap it up by clicking the ‘Save’ option. Your personalized credentials are now embedded, ready to unfold a seamless Laragon journey tailored to your preferences.
Unlocking database access isn’t as straightforward as typing http://localhost/phpmyadmin/ in your browser; an error might greet you, stating you lack permission to access the resource. Before delving into the whys of this error, it’s crucial to note that the latest Laragon version doesn’t come bundled with PHPMyAdmin.
To remedy this, take charge of the situation: head to phpmyadmin.net, where the solution awaits. Click on the download option to retrieve PHPMyAdmin. Once in hand, seamlessly integrate it into the root path. This proactive step ensures that when you navigate to http://localhost/phpmyadmin/, you’re met with the gateway to your database without encountering pesky permission issues. Embrace the solution, transforming potential roadblocks into opportunities for a smoother Laragon experience.
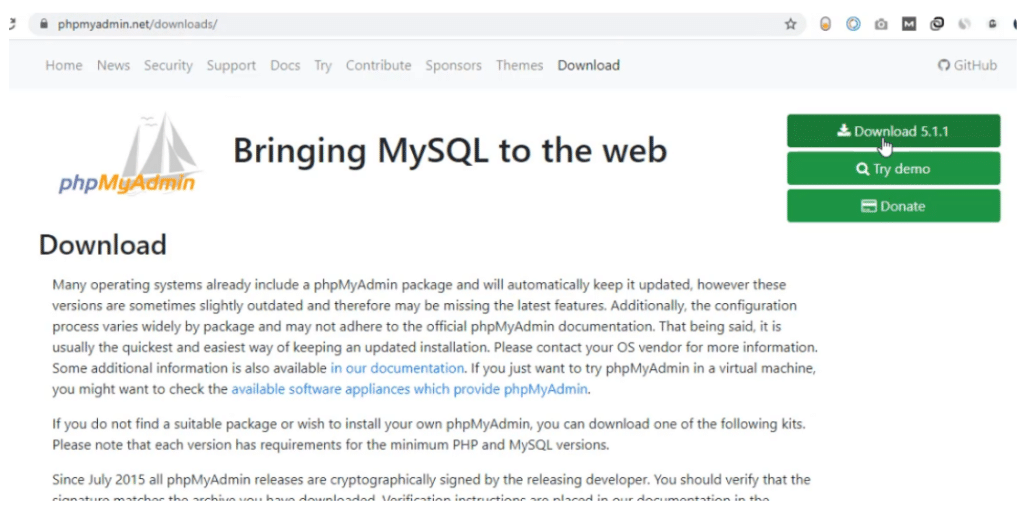
Now, let’s embark on the journey after the file has gracefully downloaded. Navigate to the root folder, meander through the laragon, etc., and app folders. Immerse yourself in the process by copying the downloaded file and deftly extracting the desired content. Here’s the magic touch – create a folder in Laragon named PHPMyAdmin and ensure that it carries exactly that name.
A little caution: if, by any chance, the folder adopts a different name like 5.1.1, take a moment to rename it to the essential ‘PHPMyAdmin.’ This meticulous step ensures a seamless integration into the Laragon environment.
Now, as you venture into the browser and enter PHPMyAdmin/localhost, watch the magic unfold – the PHPMyAdmin page materializes. You’re now ready to gracefully log in with the username and password you’ve created, marking the culmination of a thoughtful and intentional setup. Enjoy the journey into your Laragon-powered PHPMyAdmin realm!

You must define an account in the PHPMyAdmin environment. Click on user account and click new> user account.

As we navigate through this page, the previously crafted user account takes center stage. Here’s where the beauty unfolds – not only can we see these accounts, but we also hold the power to modify them. The system graciously highlights the strengths and weaknesses of each account, presenting an opportunity for tailored adjustments as needed.
Now, let’s delve into the intricacies of user account changes. At the bottom of this transformative journey, within the database box, opt for creating a database with a matching name. Tick the boxes for granting all privileges on the wildcard name (username), essentially bestowing comprehensive access to your user. Don’t forget to grant access to all, ensuring a thorough setup. Propel yourself to the next step with the resolute ‘Go’ key.
With these steps completed, the next page unveils the creation of the user with your chosen name. A glance to the left column confirms the existence of a database bearing the same name.
As we venture into the WordPress installation process, type localhost/WordPress/wp-admin into your browser. The gateway opens with a simple yet powerful directive – Click the ‘Go’ button. Let’s embark on this WordPress installation journey, blending precision with simplicity, as we usher in a new phase in your digital endeavors.
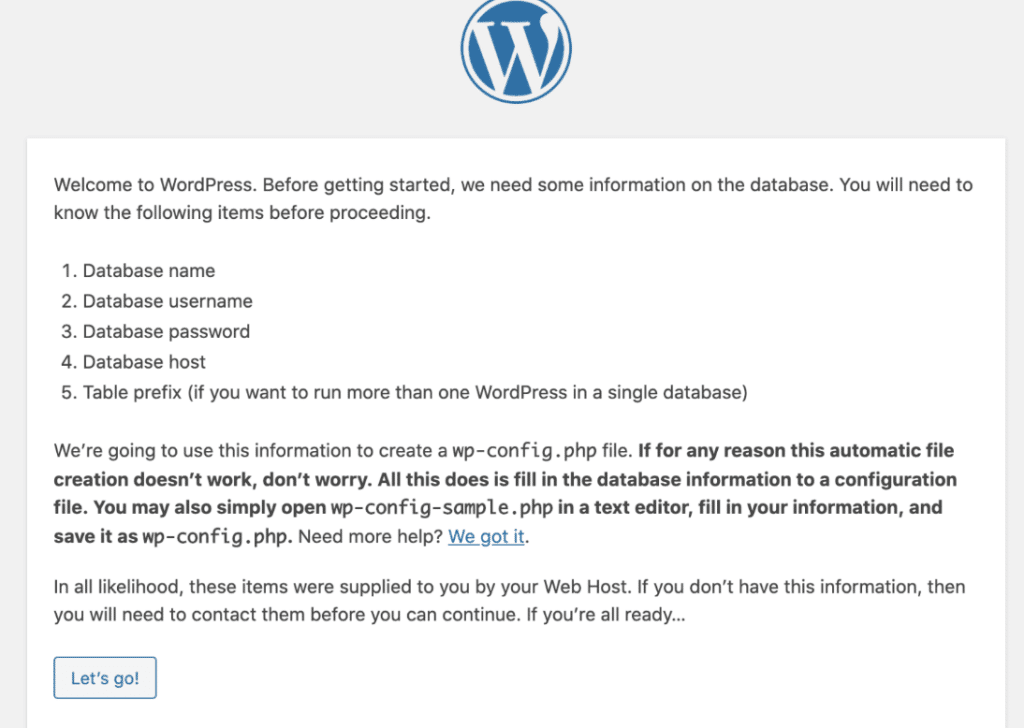
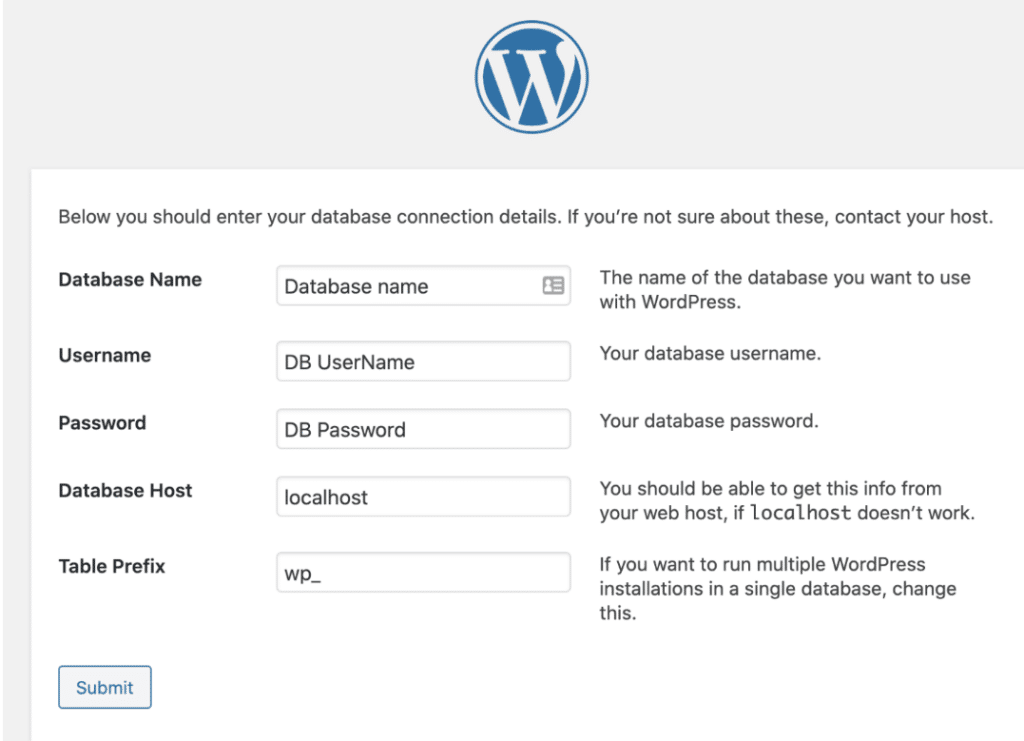
Enter the name of the database or database you created. Enter the username in the following box. Also, enter the database password in the next box.
Note that there are two other boxes called database host and table prefix that does not need to be completed. Then tap Send.
On the next page, click the startup option.
In the next section, write the title of the site. Enter your desired username and password. Request an email, enter it and launch WordPress. Add the username and password and select the login option on the next page. Quickly enter the WordPress counter. After installing WordPress, you need plugins like MihanPanel to manage WordPress.
Conclusion
Dear friends, we extend our heartfelt gratitude for accompanying us on this journey until the final words. Throughout this article, our aim was to acquaint you with Laragon and its features, offering insights to make you more comfortable with this versatile application software. We took you through the steps of installing WordPress on Laragon and crafting a dedicated database for it. For a comprehensive understanding of WordPress from zero to one hundred, feel free to explore our free WordPress training package article. Your presence and engagement are truly appreciated. Until next time, happy learning!